Having said that, I started working on the model again Thursday the 3rd May. I went back to 3ds Max to put in those final tweaks before exporting it to Mudbox.
 |
| In 3ds Max, I made the final adjustment to the snout (which I extended a bit) and the wings. The wings were bent using the rotate and move tools, as well as using the bend modifier. Because I haven't used this modifier before, I had a bit of a struggle to get it working the way I wanted it, but in the end the wings bent the right way at the right place. However, I had to keep all the polys of the wings selected the whole time when moving around the modifier stack, otherwise it would add the bend modifier to the whole of the dragon instead of the specific area of the wing. That problem was fixed once I collapsed all later on. |
 |
| The following thing to do was to make sure that there were no tris or N-gons in the geometry. Because the way Mudbox subdivides all geometry, you are not allowed to have any tris or N-gons, or Mudbox simply won't load your model. After much research on the wonderful web (and some very useless comments of "redoing your model from scratch" or "find them by eye") several people seemed to have mentioned the 2010 features in the Graphite Modelling tools called "Quadrify". I was eager to test this feature myself, but to my disappointment I saw no change in either the geometry or the poly/tri count when using it. So I had to assume it didn't work. |
 |
| After searching through the majority of the features in 3ds Max, I remembered about the STL Check modifier, but it didn't do what I wanted unfortunately. I also managed to find ways of selecting N-gons and open polys via the Selection feature, and whilst it didn't offer a way of finding tris, it helped greatly in finding other problems, especially the open edges and N-gons. It highlighted the affected areas nicely, and I was able to go to them and correct them without any problem. |
| Still not having found any way of searching for tris, I continued looking on the web for any answers. Several hours after I had started the whole tri/N-gon search, I found one very useful comment about the Selection feature. A tab to the very right side of the list, "by numeric", let me select polygons according to how many sides they had. I could insert the value myself, or just use the more/less than 4 options to search for tris and N-gons. To my relief, it came up with 0 polygons, and the amount of 4-sided polygons matched my overall poly count, so I was finally able to claim my model clean! |
 |
| I added a simple unwrap UV modifier to the model to generate a UV template, as this is needed to paint and sculpt in Mudbox. Remembering that I had only used a very basic "Flatten UV map" on my horse model last year, I was hoping I could get away with the same for my dragon. Unfortunately, it wasn't that easy. I tried to search the internet for any hits on this exact error, but I only managed to find a few, and the problems raised in those topics weren't the same as what I had. So I went back to 3ds Max and tried several different mapping options with different settings and distances, and I still don't know why none of them worked. |
 |
| Because I couldn't think of anything else to do, I tried to sort out the UV template by pelt mapping my whole dragon. I'd never used pelt mapping before, but after looking at some tutorials I started to get the hang of it. The default seams (green) set by the UVW modifier were pretty much useless, and I had to create completely new seams (blue) by hand according to where I would add the pelting. |
 |
| I decided to do the legs, feet, body, wings, neck and head all separately. Because the UV template doesn't have any significance in Mudbox later on when you paint, it didn't matter if the various elements weren't the right size or shape, or arranged for easy texturing. The seams were added with the "point to point" option, which lets you add seams along any edge in your model. |
 |
| After an area had been separated from the rest of the model, I used the "exp. faces el to seams" option. This automatically selected all faces within the area created by the newly added seams. I chose "Pelt", which opened up a new window like above. |
 |
| By selecting the stretcher, I could adjust the size and direction of it to allow for a smooth pelt stretching without any overlapping polygons. |
 |
| Once I was happy with the look of the stretcher, I chose "start pelt". This stretched the polygons out in the direction of the stretcher, making sure that all polys were exposed. I could also edit the location of the vertices individually, which was very important on the body parts that included spikes and horns, as these were too condensed with detail for even the stretcher to clear properly. |
 |
| By committing a pelt mapped area, it was added to the UV template. I arranged them outside of the active tile for now to give myself plenty of space. |
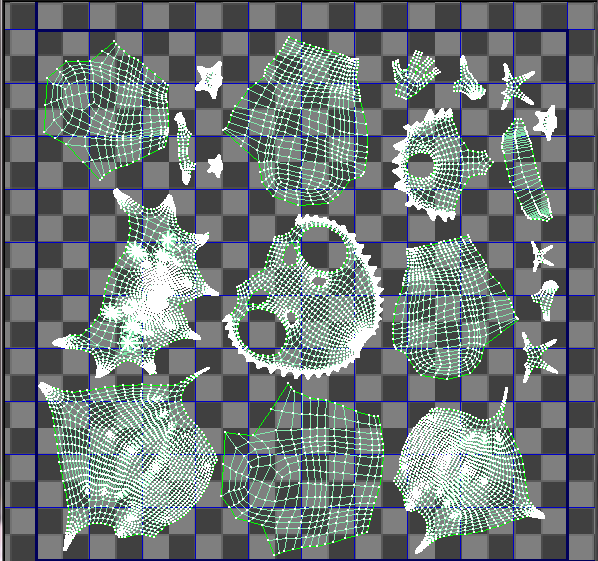 |
| Once the process was repeated for the whole dragon, I arranged the template by choosing "pack UV" from the tools tab in the menu bar. The whole process, even though it was roughly done as quick as possible, took about 5 hours in total, and I still didn't know if it would even work. I double-checked for inverted or over-lapping faces from the select tab in the menu bar. I crossed my fingers as I exported it to Mudbox. |
 |
| Success! The file opened without problems in Mudbox, and it was now ready for me to start sculpting. Unfortunately it was already too late in the night to start anything, and I still had to watch through the 16-part tutorial of using Mudbox first. This was just to re-cap on anything that I had forgotten since last year. |
So far, I've done the majority of the main muscle definitions and body structure, which should just leave the smaller details and textures. Unfortunately it's a lot more difficult to sculpt my dragon compared to my horse last year, because I don't have any good references to go by and most of the time I'm just adding muscles and definitions wherever I see fit, not necessarily where they would be. More on the progress later!
No comments:
Post a Comment